Wednesday, December 17, 2008

Grown-Up Gingerbread Men

The definitive holiday cookie is Gingerbread Men.
Here are my criteria for reaching this decision.

The Definitive Christmas Cookie:

1. Must be so special (and such a pain in the putootie to make) that they are only to be made once a year

2. However, they still MUST be made every December, and if they are not, their absence leaves one depressed and feeling quite Scrooge like.

3. Must be a Christmas culture icon

4. Must be delicious

5. Must be beautiful enough to give as an impressive gift


Let's review the criteria: #1 Gingerbread Men are one of the most labor-intensive confections I make. The large amount of molasses in the recipe makes the dough sticky and difficult to work with. This is nothing that pampering the dough in the refrigerator and rolling out between two sheets of heavily floured wax paper can't fix. Even though the dough can be frustrating, I make gingerbread every year because they're special. Christmas wouldn't be the same without them, and not many people are crazy enough to spend 5 hours on one batch of cookies. Now, on to #3, who hasn't seen the stores this year loaded with gingerbread motifs? They're on wrapping paper and tree ornaments. The even come in pre-baked kits which I'm sure taste like cardboard.


Gingerbread Men are also a personal tradition of mine. I never grew up with Gingerbread Men. So perhaps that's why I cling so stoutly to gingerbread--it's a tradition of my own making. I started it when Kent and I started dating (7 years ago) because he loved gingersnaps so much. So naturally I quested after the perfect richly spiced Gingerbread recipe I could find. There were many failures, mostly vapid versions lacking in the truly robust flavor Gingerbread should have. This version of the cookie meets criteria # 4 easily. The molasses gives the cookies a golden base note. The texture is also impressive: crunchy on the outside, with a slight chewy toothiness on the inside. There's also a secret ingredient...


The secret ingredient, which I am being incredible generous in sharing with you all, because well, it is that time of year, is fresh ground black pepper.

Yes, these cookies have black pepper. ONE HALF TEASPOON OF BLACK PEPPER. The pepper makes them warm and spicy and manages to heighten and brighten the other typical Christmasy spices like ginger, cinnamon, and clove. It's sort of like how a shot of Peppermint Schnapps heightens and brightens a cup of cocoa. And that said, these cookies might be best kept away from the kiddies. The original recipe even has a note warning its potential bakers that using the whole teaspoon of black pepper may scare off the kiddies. But, trust me, spicing up your gingerbread with a spectacular zing and kick is worth it. This is not nursery food.

And finally, #5. I use royal icing made with meringue powder to ice the gingerbread men. And, I simply find a gingerbread man seems naked until he's wearing a good amount of icing rick-rack. Royal icing is very forgivable, easy to work with, and it dries rock hard, so this icing job will go the distance...even if you're shipping a batch of these babies to antsy relatives thousands of miles away.

Black Peppered Gingerbread Men


1 cup unsalted butter
1 cup dark brown sugar, packed
2 eggs
1 cup molasses
6 cups sifted all-purpose flour
1 t. baking soda
1/2 t. baking powder
4 t. ground ginger
4 heaping t. ground cinnamon
1 1/2 t. ground cloves
1/2 t. fresh ground pepper
1 1/2 t. salt
red hots and raisins for decoration

With electric mixer, cream together butter and sugar. Beat in eggs and molasses. In a separate bowl, sift together flour, soda, baking powder, spices, and salt. Stir flour mixture into butter mixture. Divide dough into thirds, and wrap in plastic. Chill for at least one hour or up to 12 hours.

To Bake: Preheat oven to 350 degrees. Roll dough to about 1/8 of an inch thick between two floured pieces of wax paper. Keeping reserved dough in the fridge. Cut into shapes with cookie cutters.

Interesting aside..."The first gingerbread man is credited to the court of Queen Elizabeth I, who favored important visitors with charming gingerbread likenesses of themselves." Also, in Victorian England, "Tinsmiths fashioned cookie cutters into all imaginable forms, and every woman wanted one shape that was different from anybody else's. Most of the cookies that hung on nineteenth-century Christmas trees were at least half an inch thick and cut into animal shapes or gingerbread men..."
---"Gingerbread," Karen S. Edwards & Sharon Antle, Americana [magazine], December 1988 (p. 49+)

Okay, so transfer your cutout cookies to an ungreased cookie sheet. (I use parchment paper for easy cleanup.) If desired, decorate with raisins and red hot candies. Bake for 8 to 10 minutes, until crisp, but not dark. Allow to cool on the cookie sheet for a minute after baking, then remove to wire racks to cook completely.


Royal Icing

2 cups powdered sugar
1 1/2 T. meringue powder (found in stores that carry quality cake decorating supplies.)
1/2 t. vanilla extract or lemon extract
1/4 cup warm water, or more to correct consistency

Mix sugar and meringue powder. Add the water gradually and the extract. Beat at low to medium speed until desired consistency is reached. You want a firm, but easily squeezable frosting for piping on gingerbread smiles. If you accidentally add too much water you can correct by adding slightly more powdered sugar. Use immediately, or store in an air tight container, as royal icing dries hard when exposed to air.

Thursday, December 4, 2008

If stranded with only ONE Christmas cookie recipe....which would it be?

Imagine this: You're stranded--not necessarily on a desert island--I'm not that cliche. So, let's say you're stranded, perhaps a ranging blizzard has cut you off from all civilization from now until the New Year. You were fortuitous, though, and you thought ahead and bought the ingredients for ONE kind of Christmas cookie. Which Christmas cookie would it be?

Please post your comment and recipes if you want.

Then I'll share my ONE cookie recipe. The recipe that is the Christmas cookie of all cookies.

Wednesday, November 26, 2008

Cranberry Emergency

Friends, this post is meant to stave off a very dire emergency. Diane, who writes a wonderful design blog called Frivolous Necessities, is in need of a cranberry recipe. But not just any cranberry recipe. She needs the cranberry chutney recipe I got her hooked on last Christmas. It just so happens that last Christmas when I was a family-less waif stuck in Idaho for the holidays Diane roasted a delightful organic turkey and invited me over to share it. I brought something that may have changed Diane's life for the better. Cranberry, Ginger, Lemon Chutney. This recipe is so good it cannot even be considered within the same species of that gelatinous blob of reddish stuff marketed as canned cranberry sauce. Nor is this recipe the type of recipe that you'd see on the Food Network, say a recipe that is predictable in its flavor profiles like pairing cranberry with orange zest. (It seems like every cranberry recipe on the Food Network this year has had orange.) My recipe requires a bit of thinking outside the box. For instance, one doesn't usually think of onion as the perfect partner for fresh cranberries. But this chutney has layers of flavor that ranging from tart, sweet, and spicy heat balanced with the perfect amount of acid from the lemon zest and juice. And ultimately, the reason one needs such a tart, spicy accompaniment to the standard turkey, dressing, and mash potatoes with gravy, is because it gives your palate a break from the creamy, starchy laden dishes. It wakes your tongue back up, refreshes it for the next bite. It is the equivalent of drinking an assertive complex Zindfindel with a slab of richly marbled prime rib.

This recipe also has a history with my family. For years, I worked as a server at Johnny's Cafe in Omaha every Thanksgiving. I would eat a full Thanksgiving meal at 10am and then serve families that same dinner non-stop until 5pm. When I'd get home, Kent would have round two of Thanksgiving ready--which always included cranberry chutney. The exact origins of this recipe are unknown. But, Kent's mom, Karen first introduced us to it. She even gave me a copy of the famed recipe at my wedding shower. I don't know of a truer sign that you've been accepted by your mother-in-law. Once you taste this, you'll see why. And, you'll never go back to the safe status quo of cranberry sauce again.


Cranberry, Ginger, Lemon Chutney

1 medium lemon
12 oz fresh cranberries
1/2 cup crystallized ginger*
1/2 cup finely chopped onion
1 jalapeno pepper, seeded and minced
1 clove garlic, minced
1 cinnamon stick
2 cups sugar
1/2 t. dry mustard
1/2 t. salt

Grate yellow zest from lemon. Cut away and discard white pith. Halve lemon crosswise; pick out seeds. Cut into 1/4 inch dice.

In stainless steel or glass pan, combine all ingredients. Bring to boil stirring to help dissolve sugar. Reduce heat and simmer until sauce is thick and cranberries have burst, about 30 minutes. Remove cinnamon stick and serve at room temperature.

*crystallized ginger can be found in the bulk aisle of large supermarkets, or check the holiday baking aisle--I found crystallized ginger next to the fruit cake fruit.

Admittedly, this recipe takes some hands-on time. There's a lot of knife work here, but it is worth every minute of it. I promise. Plus, it can be made ahead, and it is probably better if it is because the flavors meld. So, after I drive out to Luginbill Farms to pick up our grass-fed turkey, this chutney will be the first thing I make ahead. Enjoy.


Thursday, November 6, 2008

Feeling Posh while Impoverished

We're all tightening our belts. As grocery prices rise, cutting corners on your household's food budget is imperative. But what about all those luscious, luxurious, and decadent foods you miss? I propose a solution. Liver Pate.


Now before you roll your eyes and flare your nose in disgust, please, hear me out. I'm guessing that few would argue with me that foie gras is the upper echelon of expensive, elite food. Now, think about all the things to love about foie gras. It's unctuous, melty-quality. It's smooth texture. It's rich layers of earthy flavor that are strong, but not aggressive. Humble liver pate has these same qualities, without the inhumanely force-fed goose.

I'm going to admit it, I used to be part of the liver pate uninitiated. For years, I lived with my ignorance. When I waited tables at Johnny's Cafe, the first weekend of every month was a two-day event of complementary liver pate served to every guest. I would use an ice cream scoop to plop a glop of cat food-like pate on a serving dish and bring it to guests with their bread and crackers. In all this time, I never tired the liver pate. Not even once. What I did observe though, was how polarizing pate is. Those that loved it had such a positive explosion on their palate that it sometimes made their eyes roll back in their head! Many guests came in expressly FOR Liver Pate weekend. For the ignorantly uninitiated, I found that if I did not tell people that it was liver, they would try it and enjoy it. But sadly, it took me nearly seven years (I am ashamed to admit how much delicious, liver based joy I missed out during that time) to try, to enjoy, and to fall utterly in love with liver pate.


It started two summers ago when my husband was out of town. When Kent's gone, I see it as a license to cook incredibly strange food. That summer I had several yellow summer squash plants that were as reproductive as a large colony of rabbits. I decided the only thing to do was to begin aborting squash fetus by eating as many squash blossoms as I could. (Squash plants have both male and female blossoms. It's important if you want to do reproductive damage to eat as many of the female blossoms as possible because only the females turn into squash). The only recipe I had for squash blossoms was from Fannie Farmer, and it involved stuffing the blossoms with a mixture of parsley, bread crumbs, chicken liver, and onions bound together by a beaten egg. All in all it was a perfect gateway recipe for liver. I found the novelty of eating squash blossoms, the beauty of their orangey color out-weighed any hesitation I had toward liver. I could only buy chicken livers in 1 lbs tubs, and I couldn't bring myself to throw out the rest. Again I turned to Fannie Farmer and made her liver pate. (Also while Kent was out of town.) It was quite addictive. I made several meals out of liver pate on Saltines with yellow mustard and a glass of red wine.

The most fearful thing about new foods is unrealistic aversion to the unknown. I think many people equate chicken liver with the shoe leathery slabs of beef liver fried in onions (which when prepared correctly, are delicious in their own right). Chicken livers are much milder than beef livers, and when made into pate, the texture is heavenly smooth.

Now, the great thing about chicken liver pate, aside from how decadent, elegant, and luscious it is is the fact that chicken livers are ridiculously cheap. A pound of chicken livers is usually about $1.00!

After I began making liver pate, I found that I sometimes I would get intense cravings for it. Particularly, when my body was telling me I need to bulk up on iron, like when I'm premenstrual. (My friends report craving hamburgers when their PMSing, not me, give me the chicken livers.) Chicken livers are incredible high in iron, so if you need to get more iron in your diet because of health reasons chicken livers are a great way to medicate through nourishing food, weather you're anemic or undergoing chemotherapy.


Honestly, I'm completely unbiased toward liver pate recipes. I like how dark and slightly spicy Fannie Farmer's recipe for pate is, but I also adore the lighter, creamier, and less butter laden version from Bon Appetit (September 1999) which you can find here. I also like how the garnish of a few wine-soaked figs and walnuts or pistachios really elevates this food to quite elegant proportions.

Wednesday, November 5, 2008

2 More Ways of Looking at Pumpkin

I'll admit it, I've been sitting on these two recipes for far too long. October has been over for how long? But isn't that how it goes? Sometimes life rushes at you. Sometimes you get preoccupied (with politics, perhaps?). Sometimes you just don't realize where all the time has went (recouping from Daylight Savings time ending possibly?)

The benefits of eating locally and seasonally are many. But one of the reasons it's so delightful eating with the seasons has nothing to do with the myriad of health benefits--and there are a myriad of health benefits for you, for the local economy, and for the environment. Never mind those incredibly important benefits, I want to talk about the psychological benefits of eating with the seasons. It's comforting eating the same foods year after year for only those few weeks that they're best both taste wise and nutrition wise. Rather than blurring my days, weeks, years together into an unvarying, year round nosh of fast food, microwaved dinners, and hothouse grown tomatoes and cucumbers I want my meals to be meaningful. For me, this means eating pumpkins when pumpkins are beautiful and ripe in October and November. This gives me a tangible measure of who I am, where I'm at in this world, and who I'm with. It allows me to contemplate other Octobers, other feasts of pumpkins, other times both better and worse than the present. It frees me to think about how I've changed in the past year, what I've learned, what I've accomplished, and what I still need to work on.

Eating seasonally is a way for me to build reflection into my busy life, and that's almost as satisfying as a golden, earthy bit of fresh pumpkin flesh. Almost.

So, before it's too late and pumpkin season is over, here's what I did with the rest of Penelope the Pumpkin. First, I made
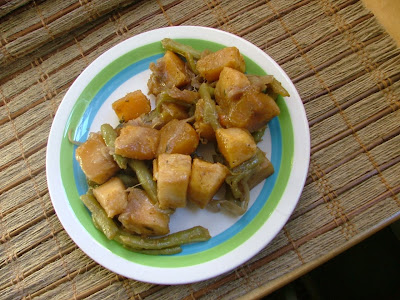
Pumpkin Saute with Caramelized Onions, Green Beans and Sweet Balsamic Glaze and then I baked a batch of Chocolate Chip Pumpkin Quick Bread.

Both of these recipes are significant because they remind me of the last two autumns I spent in Boise. In the fall of 2006, I worked at Tapas Estrella, a trendy little Spanish tapas bar in downtown Boise. I used to go to my grad classes during the day and ride the city bus from school to work in the late afternoon. Those afternoons the sun would dance the way it only seems to in the fall, and you could tell soaking up the last brilliance of sun before the darker winter months descended was important. Many afternoons I'd order the Pumpkin Saute plate for a quick, early supper before customers started to arrive. Pumpkin Saute was a big hit because it was a perfect tango of sweet/salt/acid. Tapas Estrella closed that following spring. But in the fall, I find myself missing the food and friends from Estrella, so I replicated the recipe as best as I could from my taste memories.


The great thing about this recipe is the prep work can be done in advance and then sauteed at the last minute, which makes it a great recipe for dinner parties.

Pumpkin Saute with Caramelized Onions, Green Beans and Sweet Balsamic Glaze


about 1/2 a large pumpkin (again this is a recipe in which the amounts are flexible--I'm guessing I used about 7 cups of cubed, roasted pumpkin)

2 red onions, thinly sliced
3 T. butter
2 T. fresh thyme leaves
4 cups green beans, trimmed
3 T. olive oil, divided
2 T. brown sugar, or to taste
2 T. balsamic vinegar, or to taste
salt and pepper

Prep:

Preheat oven to 400. Cut half of pumpkin into manageable pieces--about 5 inches by 5 inches and place in baking pan, skin side down. Drizzle with olive oil. Roast in oven until soft, about 45 minutes to 1 hour.

Meanwhile, heat butter in heavy bottomed skillet. Add onions and thyme. Cook over medium-low heat stirring occasionally until onions are caramelized, adding more butter if onions become dry. Don't rush this process or you'll burn the onions--you want to cook them very gently, for a long period of time to bring out their natural sugars.

Meanwhile, bring large pot of salted water to boil. Cook green beans until just barely al dente. Do not over cook! Plunge beans in ice water. Drain and set aside.

When pumpkin is roasted and cool enough to handle, skin pumpkin and cut into 1 inch cubes.

At this point all items can be kept refrigerated, separately up to two days before assembling the final dish.

Saute:

Heat about 2 T. olive oil over high heat. Add pumpkin, stirring well to coat with oil. Cook until heated thoroughly. Sprinkle with brown sugar. Add green beans and onions, sauteing until heated through. Add balsamic vinegar, salt and pepper and cook for one more minute. Taste adjust seasonings as necessary. Serve immediately.


Last fall, I babysat three-year-old twin boys to supplement my graduate stipend, and their mom gave me this recipe for Chocolate Chip Pumpkin Bread, adapted from Cooking Light, December 2004. It is everything one could hope for in a quick bread recipe. It's dense, moist, and full of flavor, the pumpkin undertone allows the cinnamon and chocolate chips to compliment each other without overpowering one another. The thing that this recipe reminds me of most, though, is the way it was the twins' first "mixed" food that they would eat. They were notoriously picky eaters, who were finally won over (at least once) by the tempting combination of chocolate, pumpkin, and spice.

Chocolate Chip Pumpkin Bread

2 cups sugar
2 cups pumpkin puree (boil pumpkin until soft, about twenty minutes. Drain. Then puree with blender, food processor, or immersion blender. If pumpkin puree seems too watery, continue to cook over medium heat, stirring occasionally until thickened to desired consistency.)

1/2 cup vegetable oil
1/2 cup vanilla yogurt
2 eggs
3 cups all purpose flour
2 t. ground cinnamon
1 1/4 t. salt
1 t. baking soda
1 cup semisweet chocolate chips

Preheat oven to 350. Grease and flour loaf pans (either 2, 8 by 4 in or 3, mini loaf pans). Combine first 5 ingredients in a large bowl, stirring well with a whisk. Combine flour, cinnamon,
salt, and baking soda in a medium bowl, stirring well with a whisk. Add flour mixture to pumpkin mixture, stirring just until moist. Stir in chocolate chips.

Spoon batter into prepared pans. Bake for 1 hour and 15 minutes or until a wooden pick inserted in the center comes out clean. Cool 10 minutes in pans on wire rack, and remove from pans. Cool completely on wire rack--or for as long as you can hold out. Slices of this bread still warm from the oven are amazingly delicious slathered with cream cheese.

Saturday, October 18, 2008

Toasted Pumpkin Seeds to the 3rd power


The first week I saw pumpkins for sale at the Perrysburg Farmer's Market, I bought one immediately and named her Penelope. Penelope was huge, easily a 25 pound-er, perfect for a jack-o-lantern. I, however, was not going to waste my time in such impractical absurdity. (Although, if we ever have kids, or little nieces and nephews, I'm sure pumpkin carving will become a necessary tradition.)

I should have waited until the pie pumpkins were harvested as they are smaller and tastier than jack-o-lantern pumpkins, which don't have reliably flavorful flesh. Gigantic jack-o-lantern pumpkins are better know for their ability to splatter into orange chunks of shrapnel when rambunctious teenagers steal them off your front porch and hurl them into the street.

The first order of business once I slaughtered Penelope (and it did feel like a slaughter this pumpkin was that big, and I had grown a bit fond of her) was to gut her. I got over this quickly though because, honestly, the visceral pleasures of pumpkin goop did take me back to my childhood and scooping out, preparing, and eating the pumpkin seeds are my favorite part of October's culinary rituals.

Admittedly, separating the seeds from the pulp can be a tedious endeavor, but this year, I took the easy way out and soaked the seeds in water to loosen them from the pumpkin guts. While this method is easy and reduces hands-on time in making roasted seeds, it has two drawbacks. First, it washes away some of the seeds' flavor. Second, it will make roasting time a bit longer, about 15 to 20 minutes longer. Ultimately, I think there are two kinds of people in this world: those that have the patience for picking pumpkin guck off of seeds by hand, and those that don't. You'll have to decide which one you are.

Then the seeds get tossed with a sweet, salty, spicy mixture of spices, creating the 3 powers that be as far as toasted pumpkin seeds are concerned.


Sweet, Salty, Spicy Pumpkin Seeds

Note: The amounts given here are a guideline, as the yield of pumpkin seeds varies from pumpkin to pumpkin. Keep the ratios the same, but adjust amounts as necessary. Penelope yielded about 2 cups of seeds.

4 T. sugar
1/2 t. salt
1/2 t. cumin
1/2 t. cinnamon
1/2 t. ginger
pinch of cayenne pepper
pumpkin seeds from 1 pumpkin, cleaned of guck

Mix first 5 ingredients in bowl, add pumpkin seeds and toss to coat evenly with spice mixture. Spread in a single layer on a greased cookie sheet and toast at 350 degrees for about 30 to 45 minutes. Stir the seeds about every five minutes to prevent burning. As you stir, be sure to scrape the bottom of the cookie sheet, as some of the sugar mixture may stick. Bake until the seeds are slightly caramelized on the outside and completely crisp to the bite.
Store in air tight container, if they last that long. These are incredibly addictive seeds.

Now, I have the rest of this pumpkin flesh to deal with. If anyone has ideas of how to use it, let me know. I'm reluctant to boil and puree it for baked good because it isn't technically a pie pumpkin, so I'm thinking roasting will be the best cooking method. Stay tuned...

Monday, October 13, 2008

Book Review: "Last Chance to Eat"


Last Chance to Eat: The Fate of Taste in a Fast Food World (2004) by Gina Mallet is an incredibly snarky British depiction of how good old fashioned British food used to be (even during the war!) and how all modern food is terrible and is only getting worse.

While Mallet, who grew up in Britain but now resides in Toronto, is extremely critical of the United States food system, for plausible reasons, that is not the what raised my hackles. The biggest problem with this book is how it whines without offering any solutions to the problems to the current food system.

The problems that Mallet covers are vast. Here is a breakdown, by chapter of the nearly extinct quality foods Mallet covers: "the imperiled egg," "the last Brie," "the ox is gored," "the lost kitchen garden," and "a good fish is hard to find." It is clear that Mallet takes an apocalyptical doom and gloom tone in her message. Yet, at the same time, she buffers this doom and gloom with nostalgic musings of taste memories.

Exalting the quality of food products before they were mass produced is laudable, but this information is inchoate without context. For instance, if anyone has had a egg from a chicken allowed to eat grass and insects, you KNOW how superior it is in taste, nutrients, and humane practice to an egg laid by a beakless, stressed out hen in a CAFO, who spends her entire life in a cage so small she can't stretch her wings. What Mallet does is sing the praises of the natural egg without so much as mentioning the recent revival in small, community-based farms sprouting up all over North America where one can buy such eggs!

What kept me reading Mallet, though was the way her nostalgic longing for foods from her childhood was relatable. The memoir-esqe portions of the book flowed with vivid memories, antidotes, and humor. Also, Mallet was able to trace how these epicuric delights were demonized, rejected, and nearly made extinct by government regulations and industry. The food history portions of the book are well researched and enjoyable to read, which is not an easy feat when one is explaining how the USDA confirmed the dangers of consuming more than 300 milligrams of cholesterol a day, while an egg contains 278 milligrams of cholesterol.

While overall, I was frustrated by the books utter lack of hope for epicures to ever find delicious, quality food again, it has made me aware of how bureaucratically ridiculous many food regulations are, and how most of the USDA and FDA's regulations are in place to support the factory farmer and big agribusiness. The most enlightening chapter of Mallet's book was "the last Brie." In this chapter Mallet exposes why raw milk and young, raw milk cheeses have been banned in the United States resulting in the lose of centuries old artisanal cheese making practices and the proliferation of pasteurized milk without the flavor or nutritional virtue.

All in all, this book only tells half the story of these lost foods. I want to search out the other half of the story, the story of how to get this food back. Mallet has made a convincing case of the virtues of these "lost" foods, but ultimately she has left me hungry, with no way to fulfill this hunger for the foods she writes of, and this is a grave oversight.

Monday, October 6, 2008

Crepe Happy

I haven't made crepes in years because they are laboriously time consuming, they stink up your house like it's the local greasy spoon diner, and the results are sort of a rubbery, limp leather glove texture.

I am pleased to announce that I've overcome every last one of these problems, thanks to dear, dear Julia Child.

I honestly had never given Child much consideration until about a year ago when I read Julie Powell's memoir, Julie and Julia (2005), about Powell's attempt to cook through the entire Mastering the Art of French Cooking Cookbook (1961). The Julie and Julia project started as blog. Once I read about Powell's disastrous Potage Parmentier, I was compelled to look up the original recipe. Luckily, at the time Boise State's library had a first edition of MtAoFC, which I had checked out continuously from August of 2007 to May of 2008. Luckily, this summer I found a pristine 1st edition of MtAoFC, at Jackson Street Booksellers for a paltry $8.50. (Kent and I hold the belief that Jackson Street Booksellers in Omaha is one of the best used books store in the country.)

MtAoFC is my go-to cookbook now. Although severely outdated, it provides such a fundamental basis for from-scratch cooking that I would be lost without it. Many food writers have speculated why America has such an enduring affection for Child, and I join the chorus when I mention her lack of pretense, her distillation of French technique for the layperson, her straightforward double-column formatted recipes, and her down-to-earth charm. I've also been working my way through the 6-disc DVD collection of The French Chef. Once you watch Child on The French Chef you fall in love with her. The early shows were taped live and are a bit rough around the edges: she loses her reading glasses, or mis-speaks and gets tongue tied, or she whacks the head off a whole fish without warning. She's a far cry from the cocky celebrity chefs on the Food Network now.

Last week, I happened to watch a French Chef episode on crepes. Buoyed by Child's effortless and lilting example, I suddenly had not only a deep primal urge for fresh crepes but the determined confidence to produce DAMN good crepes.

Crepes are essentially impossibly thin pancakes, and they are extremely versatile. You can serve them like pancakes, fill them with sweet or savory fillings to make blintzes, or use them like mannicotti stuffed with a savory filling, doused with a good sauce and baked like a casserole, or you can even layer and bake them like a lasagna.

Previously, I had used a recipe from The Fannie Farmer Cookbook, which isn't as good as Child's because the batter is thicker as it calls for no water, resulting in the leathery glove consistency. The crepes are also fried in butter, which burns easily at the high heat necessary for crepes, resulting in the greasy spoon aroma. As for the laborious part, Child recommends using a blender to mix the ingredients (I used my food processor, and it worked fantastic). Child also insists that with a little practice, "it is no problem at all" to get two pans of crepes going at once, thus cutting your work time in half. Lo and behold, I was able to churn out 20 crepes in about 10 minutes!

Crepes (adapted from MtAoFC)
makes about 18 to 20 crepes

1 cup cold water
1 cup cold milk
4 eggs
1/2 t. salt
2 cups a.p. flour, sifted
4 T. butter, melted

Combine all ingredients in bender or food processor and blend at top speed for 1 minute. Cover and refrigerate so that the flour can soften and absorb the liquid. This results in a softer, lighter, practically ethereal crepe. Child recommends letting it chill for 2 hours. I only managed to give my batter a 1 hour rest, and the results were still quite good. You could also chill it overnight.

When ready to make, heat two skillets (with about 6 inch diameter bottoms), and grease with a vegetable saturated paper towel. Heat should be very high. As soon as oil begins to smoke, grab pan of off heat, and ladle in about 1/8 to 1/4 cup of batter. Using your wrist action to swirl the batter around. You want just enough batter to completely coat the bottom of the pan and stick. If there's more than that, pour the excess back into the batter bowl, and adjust the amount of batter for the next crepe.

Cook over high heat for about a minute or until the edges of the crepe are dry, and it releases easily from the bottom of the pan. If you're as talented as Child, you'll be able to flip the crepe with a flick of your wrist or lightly grab the dry edges of the crepe with your fingers and turn it with your hands. If you're a mere mortal in the kitchen, like me, you'll need to use a pancake turner, which works just fine. Cook other side about 30 seconds or until small brown spots emerge that look, like Child says, "look almost like the spots of a baby dalmatian."

When cooked, remove to plate. It is helpful to put the growing stack of crepes in a warm oven if you're going to serve them like pancakes, but if you're going to make blintzes or stuffed crepes it is not necessary, and keeping them warm in the oven dries them out a bit.

Crepes freeze and refrigerate beautifully, so save any leftovers for other dishes.

The first night I made blintzes with a ricotta cheese filling. (My apologies for the photo styling. My Ohio kitchen is sorely lacking in the natural light my Idaho kitchen had, and I'm still trying to figure out the necessary adjustments to remedy this problem.)


Blintz Filling adapted from The Enchanted Broccoli Forest by Mollie Katzen (1982).

7 oz part-skim ricotta
1 T. sugar
1 1/2 T. a.p. flour
dash of salt

Mix ingredients well.

To assemble blintzes, place a heaping tablespoon of filling in the center of one crepe and roll like a burrito. The blintz will resemble an egg roll.

Then, carefully saute blintzes over medium-high heat in a small amount of butter until golden brown, using tongs to gently turn the blintzes so each side cooks.

Top with fruit and whip cream, or if you're ambitious, make an recipe of Brandied Baked Pears as a topping and dust with cinnamon and powdered sugar before serving.


I was inspired to make Brandied Baked Pears because of these delicious beauties. When was the last time you saw such beautiful, golden blemish-free Bartlett pears in the supermarket? My guess is never. They just are too fragile to transport long distances. I got these at the Perrysberg Farmer's Market, and the are by far the most amazing pears I have ever eaten. They exploded with a sweetly tart perfume flavor and with chin dribbling juice at each bite.

They were so good, in fact, that even Henry Miller liked them.


Monday, September 29, 2008

How I love you, mon petit chou

For as long as I can remember, I have eaten cabbage. I never had an aversion to it, or a phase when I wouldn't eat it. It doesn't make me gag, like it does some of my friends. But, I've also never appreciated it either--until now. Cabbage has always been there: pale and limp when boiled with corned beef or in stringy nest of tangy sauerkraut.

Cabbage has been far too under appreciated. I suppose the stench of boiled cabbage contributes to its bad image. Cabbage's connotation of poverty has not helped its reputation very much either. However, being the unemployed waif that I am, I am suddenly enamored with the brassica. It could just be that I'm spending too much time "cabbaging about" on the couch as the British would say. Still, when I saw heaps of cabbage heads at the farmer's market, I was charmed. These were not the cellophaned, sterile looking heads of cabbage at the Kroger. No, these were magical heads of cabbage. Their dark green leaves were still attached, un-furling themselves to show the promise of the cabbage crown, the pate of tightly curled, spicy crunchy vegetable. These were romantic cabbages. Cabbages that made me understand the French endearment: "mon petit chou." Upon reflection, my fantastical preoccupation with cabbages, probably stems from the fact I turned 4 years old at the height of the Cabbage Patch Kids craze. Again, these food moments of remembrance past continue to resurface.

I bought a gigantic cabbage weighting over 5 lbs for $1.50. Part of it went into the aforementioned Runzas, and with the rest of it, I made sauerkraut. Again, four-year-old Sarah surfaced. When I was little, I used to watch grandma Krahulik making sauerkraut. I remember her pulling the head of cabbage across an antique wood and steel mandoline that looked like a medieval torture devise--that is if one had a childishly overactive imagination and fancied a human head in place of the cabbage head, and blood instead of thin shreds of cabbage leaves. Then, throwing all the cabbage together with salt and waiting for it to ferment, essentially practicing controlled food spoilage makes sauerkraut making seemed a bit--well, edgy.

It's not. In fact, making sauerkraut has seems to fall comfortably into the category of domesticity that contains folding dish towels or kneading bread dough. Simple and ordinary and comforting.

Making sauerkraut is ridiculously easy. (So far. I still have to let it ferment completely, which could take several weeks.)

Un-Edgy Sauerkraut

Ingredients:
1, 5lb cabbage, chopped or sliced into thin shreds
3 T. salt

Special Equipment:
2 gallon, non-metallic container, impeccably clean (Preferable a ceramic crock, but glass or food-grade plastic will work too.)
Plate that will fit inside container.
Weight of some sort. (I used a 10lbs. hand weight, a large clean rock, or a gallon milk jug filled with water will work too.)
Clean kitchen towel or pillowcase.

Seasonings: (Optional)
caraway seeds
juniper berries

Mix chopped cabbage, salt, and seasonings together. Pack firmly in ceramic crock. Use your fists to punch cabbage firmly down. Place plate on top, and top with clean weight, cover with kitchen towel.

The salt will draw the water out of the cabbage, and the weight helps press the water out. Within 24 hours the briny cabbage water should total immerse the cabbage and the plate, if not add enough brine (1 cup water to 1 t. salt) to cover.

I've read that a moldy scum or "bloom" will develop on the surface brine, which, if it appears will have to be skimmed off.

Let ferment in cool spot for 1 to 4 weeks.... to be continued. I'll keep you posted.

Thursday, September 25, 2008

Land of the Unfamilar and the Unemployed

Holly has brought it to my attention that I have been slacking off lately, and she's right. I've let my days get sucked up by unpacking, decorating, and spending countless hours roving Monster.com and Career Builder in hope that there's an employer out there that would love to hire an English lit. major who's obsessed with food. When I get weary of writing cover letters and revising my resume, I crawl to the couch. Kent and I have been watching reruns of Arrested Development (whose unemployed characters I'm beginning to relate to more and more everyday) and classic episodes of the French Chef on DVD.

Moving is stressful, but settling into a new place is even harder. For the past month it's felt like I'm still traveling, still on a trip in a strange place. I can't leave the house without a map or a map quest print out. I struggle to find the right place to go out to eat, to buy groceries, to find micro-brewed beer. All that innate wisdom that comes with knowing a place really well, of being a local, well, that acquired knowledge just hasn't had time to bubble up, grow, ferment for me here in Bowling Green.

I'm making progress though. I've discovered a lovely farmer's market in Perrysberg, a short 15 minute drive from my house. (Where I bought cabbage and local ground beef for Runzas.) I'm slowly building up my pantry and my arsenal of condiments. (My friend Kelly thinks we should all be given a condiment stipend whenever we move because buying new jars of soy sauce, fish sauce, relish, mustard, ketchup, mayo, Worcestershire, jelly, honey, tahini, anchovy paste ect, is expensive.)

Then, there's also the matter of settling into a new kitchen... It's a lot like finding a new dance partner. This new kitchen has me stumbling over my own feet. It trips me up as I choreograph dinner. Instead of fluidly keeping rhythm with me as a reach for this pot, grab that pan, find the jar of ground cumin, or rummage through the drawer for a measuring cup, this kitchen is stilted and clunky. Oh, we're getting to know each other better, this kitchen and I. I'm working on rearranging things just so, memorizing with my feet and arms and hands where everything is, but it takes a lot of practice and rehearsals.

This week my kitchen and I worked on perfecting homemade Runzas. I'm not sure if it's because I'm back in the Midwest, or because it's fall, or because when everything is new the urge to return to childhood foods becomes impossibly strong, but whatever the reason, the Runzas were perfect: satisfyingly hearty and best eaten with your hands.

Sarah's Runzas
makes 8

Dough:
1 1/2 t. dry yeast
1 cup lukewarm water
2 t. honey
1 1/2 t. salt
approximately 3 cups all purpose flour


Dissolve yeast in warm water and let stand for for 5 minutes. Stir in honey and salt. Add flour, stirring until rough dough forms. Then, either turn out onto floured work surface and knead by hand or knead with dough hook in stand mixer about 15 minutes or until dough is smooth and elastic. Place dough in oiled bowl and turn to coat. Cover with plastic wrap and let rise at room temperature for about an hour or until doubled in size.

Filling:
1/2 lbs. ground beef (preferably grass-fed, organic beef)
2 small onions, chopped
2 cups cabbage, chopped
1/2 t. caraway seeds
dash of garlic powder
salt and pepper to taste
1 1/2 cup shredded cheddar cheese
melted butter

Over medium high heat, brown ground beef with onions. Drain excess fat. Add cabbage and cook over medium heat until cabbage is soft and nearly translucent. Add caraway seeds, garlic powder, and salt and pepper. Taste and adjust seasonings as necessary.


To Assemble:

Preheat oven to 425 degrees. Roll out dough, about 1/8 in. thick, forming a rectangle shape. Cut into eight, smaller rectangle shapes about 3 inches wide and 6 inches long. Put about a 1/4 cup of filling in center of each Runza, top with shredded cheese, then fold edges together in half. Press seams of dough together firmly. Place on buttered cookie sheet. Before baking prick holes with fork in Runzas and brush with melted butter. Bake for about 15 minutes and until Runzas are golden brown. Let cool for at least 5 minutes before serving, and even then eat with caution as filling will be extremely hot! Kent likes to eat his with mustard and ketchup.


And I must admit it, these are much better than their fast food counter part. For one, they don't contain nearly as much sodium, and you know exactly what's in them. Plus, if you're anything like me, you get an innate sense of satisfaction of making something with your hands, seeing a process through from raw ingredients, to delicious finished project.


Friday, September 12, 2008

My Run to Runza

Hi , out there! I'm finally back in the blog grid. I've had an incredibly busy several weeks spent primarily on nesting in my new house. It takes a lot of elbow grease, flea market/Craig's list shopping, curtain making, furniture re-arranging, box unpacking, and picture hanging to make a house into a home. I'm almost there. Today's nesting culminated in the delivery (thanks, Toby!) of a vintage silver-gray couch, in pristine condition that I bought on Craig's list for the ridiculously cheap sum of $40. But before I show you around my new kitchen, which is perhaps the best feature of this house, I want to spend some time recounting the food adventures I had on the way to my new home in Ohio. Mainly, I want to tell you about the foodways I traveled with friends and family in Nebraska, my home state.

My Nebraska food adventures began with my run to Runza.

If you know what a Runza is, then you're probably a Nebraskan (although Runza chains do exist in other Midwestern places like South Dakota and Kansas). Runza the restaurant, named after its signature stuffed sandwich, is an iconic Nebraska fast food franchise started in 1949 in Lincoln, Nebraska. Read more about Runza's history here. The minute I made it to my sister's house, the first thing we did was go out to Runza. I realize that after eschewing fast food my entire road trip, this may make me something of a hypocrite. However, in my defense, Runza is the closest I've seen fast food get to the slow food movement. Although this may be just clever marketing copy from their web page, one of my sister's friends actually worked at Runza when he was in high school, and he confirms each franchise does make their own Runza's from scratch!
So apparently, the homemade difference is no lie. But, why am I getting so insanely excited about a Runza? What exactly am I getting all worked up about? A Runza is simply seasoned ground beef, onions, and cabbage enclosed in a yeast dough and baked. It's a hot pocket without the microwave, a calzone for the non-Italian, an empanada for the initiated, a piroshki that isn't Greek to me. A Runza is utterly delicious.

For $1.99, this little packet of pastry was every bit as good as I remember as a child. It's savory and simple like the best comfort food should be. The onion and cabbage are slowly cooked until they obtain a translucent, near transcendence creaminess, which contrasts nicely with the meaty heartiness of the beef. I couldn't say what the "secret seasonings" are that Runza claims they use, but I'm guessing that it can't be anything more fancy than fresh ground black pepper and a little Kosher salt.

Simplicity aside, the Runza is also adaptable in infinite combinations. (There are several different variations on the classic available--the one with Swiss cheese, which my sister ordered, is very nice.) In elementary school, the cafeteria used to serve Bunza's, a non-trademarked version of the Runza that had a Velveeta-like cheese in it in addition to the cabbage and ground beef. My mom makes a casserole version that uses refrigerated pastry dough for the crust. (Mom, if you're reading this, feel free to post the recipe for all of us Runza addicts out there.)

So, if you're ever in Nebraska, and you see a Runza restaurant, know that you can stop and get delicious food. Coming from someone who hasn't eaten at a McDonald's in 9 years, this should mean something. Or maybe it just means that sentimentality can sometimes cloud my better judgment. Either way, my Runza was delicious and comforting in a way that I'd argue a Big Mac, cannot be, but you'll have to judge for yourself.

Tuesday, August 19, 2008

Alone in a Hotel Room with Sandwiches (somewhere in Wyoming)


I know that I said I was going to take some time off from Prose and Potatoes, but... well, the hotel has wifi, and what else am I going to do alone in a hotel room besides eat, sleep, and watch bad T.V. (and I mean bad T.V., they don't even have the Food Network!)

Plus, I got so excited when I sat down to dinner, that I have to share it with you.

I do not believe in road food. Road food in Interstate-land America is grim. Either you cave in desperation to the first fast food joint you find, or you treat the snack food aisle at Flying J like a buffet line. Aside from being expensive, these options are vapid and a nutritional nightmare. I don't know about you, but after sitting in a car all day, my body has taken enough abuse that I don't feel like bombarding it with saturated fat, sugar, and excessive amounts of sodium.

According to MapQuest, I drove 688.09 miles today. It took me 12 hours, and I didn't have to stop and buy food once. Now I know some of you may be rolling your eyes at this point at how absurd it sounds to spend the night before your trip cooking. Before you begin to think I'm Betty Crocker on uppers I want to show you how easy it is.

First, nothing can be simpler than sandwiches. You can eat them with one hand at the wheel, and trust me anything you make will be better than the grab-and-go deli section at the travel plaza. Today, I had one egg salad and one hummus, Parmesan, cucumber both leftover from earlier this week so no extra prep time. Throwing together a few p.b. and honeys or almond butter and raspberry jam takes but a moment.

Next, I recommend a grain and vegetable salad that is sturdy and equally delicious whether cold or at room temp. I made a quinoa salad with tomatoes and a green bean, sweet corn, and feta salad with balsamic dressing.

Then, add some easy to eat fruits and veggies. I have been eating cherry tomatoes, sliced red bell pepper, and sliced cucumber. (Did I mention my car has no a/c? It is amazingly refreshing to reach over to your cooler, and pull out a bag of icy cold cucumbers when you're beginning to wilt from the heat.) Bananas and apples are also great because they're sturdy and won't take up valuable cooler real estate.

Finally, don't forget some carbs. A few Odwalla bars, or homemade pemmican bars (thanks Kaedra!) [Recipe forthcoming.] Or a scone or cookie (thanks, Jenn!) are perfect for breakfast with that travel mug of much needed coffee.

Also, don't be scared into thinking that traveling with a cooler is burdensome. For this trip the only thing I had to use was a cheap Styrofoam (no CFCs) cooler, and it works as great as our real cooler that's in Ohio with Kent. After 12 hours, I still had ice. Tomorrow, I'll refill it with ice from the hotel machine instead of regretting an egg Mcmuffin. One word of warning though, ice turns to water. So all food must be packed in secure waterproof containers. If you wouldn't throw it into the bathtub, and then open it and eat it, then don't put it into the cooler. Disposable/reusable plastic containers work great because they're completely waterproof and food won't get smashed.

So, now with all the money I've saved avoiding road food, not only do I have a larger discretionary restaurant spending budget when I get to my destination and can eat in REAL restaurants, and I'm also feeling healthy and energized. I hope this inspires you to rethink what you eat on your next road trip.


Green Bean, Sweet Corn and Feta Salad with Balsamic Dressing

This is a taste and tinker recipe because I through it together incredibly quickly last night so here are the approximate amounts of ingredients.

1 1/2 cups green beans, fresh, cut in 1 inch pieces
One ear corn, kernels cut from cob
1/2 red bell pepper, chopped
handful of cherry tomatoes, whole
about 2 oz. feta cheese, crumbled

Set large pot of salted water to boil. Boil greens for 2 minutes, and corn cook for 3 or 4 more minutes or until beans are crisp/tender. Don't overcook! Drain.

Mix beans and corn with bell pepper, tomatoes, and cheese. Coat with dressing.

Dressing:
Mix together equal amounts of olive oil and balsamic vinegar. Add the juice of half and lemon and season with salt and pepper to taste.

This salad develops its flavor as it sits in your cooler all day. It would also be great mixed with a little cold, cooked rice.

Monday, August 18, 2008

So Long Boise....Thanks for all the Tomatoes

There are many foods that remind me of a specific person or place or time in my life. Foods that, whenever I eat them, I remember where I was and who I was with the first time I tried it.

Not so with tomatoes.

Tomatoes are one food that has been with me since before I remember. Tomatoes fresh from the garden have just, well, always been. My parents always grew tomatoes in the garden and the only way I remember eating them when I was little was in BLTs or fatly sliced with a bit of salt and pepper. Straight from the garden tomatoes are simple, unpretentious, the perfect balance of sweet acidity, fleshy skin, and juiciness. This is how I've been enjoying them lately.


The past few weeks have felt heavy with weight of trying to soak up one last everything from Boise before I leave her forever tomorrow. So in addition to trying to soak up as much lycopene as possible from my dear garden, I've been saying good byes. This involves quietly and unceremoniously admitting to myself this is the last time I will ever see Boise exactly like this, exactly as I am now. Frankly, it's exhausting. This goodbye has been drawn out long enough.

So, tomorrow, when I hit the road at 6 am, I'll be carrying with me a basket full of tomatoes, a few potted fresh herbs, and lots of memories. And next year, when I'm eating tomatoes from my new garden in Ohio, I'll remember fondly these last few tomato filled days of Boise.


Postscript: I will be off the blogging grid for a couple of weeks. My journey to Ohio is going to have a few pit-stops along the way to visit friends and family. I'll return to Prose and Potatoes in September and show you my new kitchen and tell you about the new foods I'm finding in Ohio.

Thursday, August 7, 2008

Food = Consciousness

“Food is a yardstick of consciousness,” writes Doris Friedenson in her essay, “Chapulines, Mole, and Pozole: Mexican Cuisines and the Gringa Imagination” (165). While I haven’t eaten chapulines (grasshoppers), it’s only because the opportunity hasn’t arose yet, and this, Fridensohn argues is because the “foods we eat tell much about where we have lived and where we have traveled” (165). So instead of writing about chapulines, mole, and pozole, I’m going to write about where I have been, namely where I’ve been for the last two years: Boise, Idaho. As I can count down my days left in Boise on both hands, I’ve begun to think about the indelible food prints Boise culture has left in my life.

Here is a list of the things that Boise, with its heritage of Basque immigrants, Spanish food, and Northwestern hippie/fusion cuisine, has opened my palate to in the brief two years I’ve lived here:

  1. Lamb (I honestly don’t remember ever eating lamb before moving to Idaho, and because a lot of lamb is raised here-due in part to the first Basque, sheep-herding immigrants at the turn of the century I suppose this makes sense).
  2. Manchego cheese (and any other sheep’s milk cheese, also that Spanish/Basque connection)
  3. Serrano Ham. (My love of pork products has increased ten-fold since moving here, dry aged hams in particularly make my taste buds quiver. The head cheese experiment also helped encourage my new found pork obsession).
  4. Smoked Paprika (this is Estrella’s influence, the tapas bar where I used to work introduced me to this powerful, and delicious seasoning way before Rachael Ray started singing its praises.)
  5. Lavender (I didn’t even know it was edible until I saw it being sold as a culinary herb at the Boise Farmer’s Market. Now I make a wicked lavender vinegrette to dress salads of greens, goat cheese, and candied pecans, which is a spin on Bungalow restaurant’s signature salad.)
  6. Trout (sure everyone eats salmon, but trout? Delicious. Think sort of the more mellow, laid back little brother of salmon.)
  7. Hazelnuts (I’d eaten them before, but I never baked with them so much before. Hazelnuts are largely grown in Oregon. I could get them in bulk here relatively cheap, which is something I’ll miss when I’m gone.
  8. Sourdough. (This is a western thing dating back to the Yukon territory and the Gold Rush, and pioneers who brought sourdough along with them in covered wagons. I heard friends talk about sourdough cultures—thanks Kelly— and thought I should try my own. Norton (aka my sourdough starter) will be traveling to Ohio with me, in sort of a reverse Oregon trail pilgrimage.
  9. Berries. (Of course I have had blackberries, blueberries, and raspberries before moving here, I just hadn’t had local berries as good or as fresh as this every before.)
  10. IPAs (in outdoorsy, hippie country like this Indian Pale Ales are everywhere. I don’t know that I’ve fully acquired a taste for them yet. But, I can drink them comfortably, whereas, two years ago, if it was hoppy enough to bounce around on my taste buds like a super ball, I couldn’t choke it down.)

So there you have it, my top ten food memory map for the Boise, Idaho stage of my life. These things I’m sure I will miss, as in some instances it will be hard to find some of this food, the way I remember it, in Ohio. But, it also leaves me wondering, what new list, will I create in Ohio?

Foods connect me to people, to places, to memories, and the quest to find them, to recreate a cherished dish is just a part of self-creation, of self-definition in the constant flux and inevitable change of life.

Friday, July 25, 2008

No Itadakimasu to Spam Sushi

An open mind is an important asset. I consider myself an open-minded person, especially when it comes to food, so at the mention of Spam Sushi instead of shuddering like a saner person might of, I thought why not?


Many forces collided in my life to result in my lack of judgment. First, I am under a considerable amount of stress trying to ready my life and household goods for a cross-country move in 10 days. Therefore, I am desperate to clean out my pantry and freezer, so I just happened to have a few sheets of nori and some sushi rice that needed a purpose. Second, I am an NPR junkie, and I happen to see an online profile of a new cookbook called Hawaii Cooks with Spam, which was intriguing , exotic, and kitschy all at the same time. I have a weakness for just such things. Third, that week's Food section in the newspaper happened to be about the come back Spam is making in these economically depressed times. This was a sign. In retrospect, this was a very ominous sign.


I am no stranger to sushi rolling. I love making sushi what I don't love is paying up the nose for sushi grade fish on my let's-finance-a-several-thousand-mile-move-this-month budget. However, this recipe from Hawaii Cooks with Spam was fatally flawed from the beginning. Although I followed the directions for cooking the rice perfectly, the end result was crunchy. Trying to salvage the pot of rice, I added more water and cooked longer. This resulted in slightly mushier rice than I would have liked. The rice dressing was also problematic. Usually I use a mixture of rice vinegar, sugar, and salt, that is more tangy than sweet. This recipe called for equal parts vinegar and sugar in addition to mirin. I substituted the mirin for some plum wine I happened to have on hand, but that couldn't have screwed up the recipe that badly because the dressing was still sickenly sweet.

Aesthetically, the rolls came out perfect. They would have tasted better had I omitted the Spam and just rolled plain cucumber in them. I don't want to be a food snob here, but when your frame of reference for sushi is maki rolls made with firm, velvety, slabs of yellow fin tuna that melt in your mouth upon impact, then a cold, coagulated slab of assorted pork product is not only sacrilegious, but just plain disappointing.

While the NPR profile author, Neva Grant claims "the taste of Spam is not detectible in Miura's roll. An unwitting diner might think it was a chewy bit of avocado or maybe a very pink piece of egg," this is not true, and even if it were, the texture alone is enough of set back for this roll.

I have eaten Spam and enjoyed it in an illicit thrill sort of way. It's not nearly as bad as I previously thought, and I was thinking back to summer camp hazing rituals that involved Spam. You don't want to know the details. Spam is too World War II, Donna Reed-esqe to succumb to Asian fusion. It's best served with Velveeta and perhaps some scrambled eggs because sometimes, keeping things in their proper place is the right thing to do. Spam is sushi is wrong in so many ways.

Muriel Miura, the author of Hawaii Cooks with Spam, "suggests that after slicing it up into rolls you say 'Itadakimasu,' which means 'thank you for this meal' in Japanese." I, however, think it would be best to say no itadakimasu to this one. Yet I am intrigued by Miura's Spambalaya recipe...

*Thanks to Marianne for the photo


Friday, July 18, 2008

Molly Wizenberg's "Fluff Piece"

If any of you read Wizenberg's July article in Bon Appetit, and were a bit atheistic in your belief that homemade marshmallows could be not only easy to make, but more delicious than their store-bought counter parts, than I'm here to proselytize.

The process is quite simple. You dissolve some unflavored gelatin in water in the bowl of a stand mixer. Meanwhile, you boil a simple syrup of water, sugar, and corn syrup. When that mixture is hot enough, you drizzle it into the mixing bowl, while whisking. At first, there's a grayish sludge sloshing around, but soon, billows of sticky marshmallow fluff erupt in a manner reminiscent of the Stay-Puff marshmallow man in Ghost busters.

Then the mixture gets patted into an oiled, aluminum-foil lined pan. This is the hardest part. The marshmallow is still quite hot at this point, and it strings out and sticks to EVERYTHING but preserve. Wetting my hands and rubber scraper with cold water, helped considerably.

And, hey, I wasn't complaining about not being able to get the beater clean, because what I couldn't scrap off, I ate off.

Then the marshmallows need to set up at room temp for at least four hours. I left mine overnight. Then, I dusted the marshmallows with a mixture of powdered sugar and corn starch (Wizenberg calls for potato starch, but I couldn't find it in Boise supermarkets.) You cut into slices, and viola!

Amazing marshmallows! The fresh creaminess of these marshmallows is quite startling they're so good. I made s'mores with these and the way they toasted was almost like creme brullee. A wonderful, golden, caramelization that just isn't possible with store bought marshmallows.

Thursday, July 10, 2008

Hands On Pasta

There's nothing quite like cleaning all the dust bunnies and skeletons from your closet to make you realize just what kind of person you are. As I'm tossing my superfluous material positions in the every growing mound marked for Goodwill, I'm unearthing eras of my hobby life. There was the handmade paper phase, the hand-bound journal phase, the acyclic paint phase, the scrap booking phase, the Fimo clay phase, the beading phase, the homemade head band phase, the hemp jewelry phase, ACK! All of that crafting equipment adds up, but I will never toss the pasta maker my mom handed down to me.

I am torn between believing I'm either a dilettante of the worst kind or else I'm just a person who gets immeasurable pleasure from making things with my hands. While I'm not sure which way the scales tips for me, I do know one of the most tactile, most thrilling things to do with your hands in the kitchen is make hand-rolled pasta. Home-made pasta delights all the senses from its golden eye-popping hue, to its earthy, egg and wheat pungency, to its Play Doh-like squish, to the small squeaks of the rolling pin or pasta machine. If you make your own pasta, your rewards are more than in taste alone. It's a relaxing, meditative process.

After mixing the dough, you roll it out thin. Here's a sheet of pasta dough after being rolled through the pasta machine 7 or 8 times. You can do the rolling by hand with a rolling pin, and your pasta will still turn out great, it will be more heartily rustic, and it will take a bit more time.

This time, I decide to make spaghetti. I also have an attachment that will cut fettuccine. If you don't have a pasta machine, you'll want to fold your rolled-out dough over itself until it's a roll of about four inches, then you cut through all layers at once, and when unrolled you have single, long strips of pasta.

Even though some recipes will tell you to dry your pasta for several hours before cooking, I've found that it's fine to toss in a pot of boiling water immediately. Do not refrigerate unless it is completely dry, or the spaghetti will turn into a gray, mush when cooked.

I've played around with several different pasta recipes. I've found that recipes that call for all semolina flour have a too course of textures. Recipes that demand a combination of all purpose and semolina flours with a dash of olive oil produce the results closest to store bought, dried pasta. But what's the fun in that?

The hands down, best pasta recipe is also the simplest. My mom gave it to me years ago, and it goes like this:

Hand-Made Pasta Dough

2 eggs, beaten (organic, free-range eggs are preferred)
generous dash of salt
enough AP flour to form a dough the consistency of Play-Doh

Beat eggs and salt together. Gradually add flour until desired consistency is reached. (If you wrap the dough in plastic wrap and refrigerate for about 30 minutes, the dough will be slightly easier to work with, but it's not necessary.) Roll out by hand or with pasta machine and cut into desired pasta, or drop into soup by teaspoonfuls to make egg dumplings. May take slightly longer than store-bought pasta to cook. But it's worth every extra minute.